
Asp.Net form elemanlarını incelemeye devam ediyoruz bu uygulamamızda CheckBoxList ve CheckBox elemanlarının kullanımı ve özelliklerini içeren bir sayfa yapacağız.
İlk olarak CheckBoxList ve CheckBox nedir ondan bahsedelim, CheckBox kullanıcıya sunulan birden fazla seçenekten istediklerini seçmesini sağlayan bir elemandır, örneğim hobileriniz, gezdiğiniz iller vs.. hobi olarak kitap okumak, tv seyretmek, gibi birden fazla seçenek kullanıcıyı sunulur kullanıcı bu seçeneklerden bir veya daha fazlasını seçebilir. Bu seçimlerin hepsine birden daha kolay ve hızlı bir şekilde ulaşmak içinse CheckBoxList nesnesini kullanabiliriz.
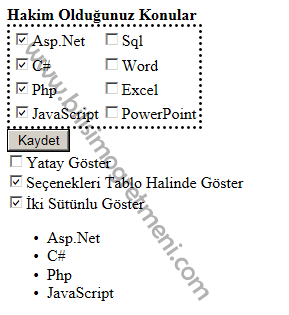
Hemen konu ile ilgili bir örnek yaparak devam edelim sayfamıza bir CheckBoxList, 3 CheckBox, 1 Buton ve 1 BulletedList ekliyoruz, eklediğimiz 3 ChecBox’ın AutoPostBack özelliğini true yapıyoruz , CheckBoxList’in BorderStyle özelliğini Dotted yaparak aşağıdaki görüntüyü oluşturuyoruz.

Sayfayı oluşturmak için Kodlarımız
  <div align="left" style="width: 259px">
        <b>Hakim Olduğunuz Konular
        </b>
        <asp:CheckBoxList ID="CheckBoxList1" runat="server" BorderStyle="Dotted">
            <asp:ListItem>Asp.Net</asp:ListItem>
            <asp:ListItem>C#</asp:ListItem>
            <asp:ListItem>Php</asp:ListItem>
            <asp:ListItem>JavaScript</asp:ListItem>
            <asp:ListItem>Sql</asp:ListItem>
            <asp:ListItem>Word</asp:ListItem>
            <asp:ListItem>Excel</asp:ListItem>
            <asp:ListItem>PowerPoint</asp:ListItem>
        </asp:CheckBoxList>

        <asp:Button ID="Button1" runat="server" onclick="Button1_Click" Text="Kaydet" />
        <br />
        <asp:CheckBox ID="CheckBox1" runat="server" AutoPostBack="True"
            oncheckedchanged="CheckBox1_CheckedChanged" Text="Yatay Göster" />
        <br />
        <asp:CheckBox ID="CheckBox2" runat="server" AutoPostBack="True"
            oncheckedchanged="CheckBox2_CheckedChanged"
            Text="Seçenekleri Tablo Halinde Göster" />
        <br />
        <asp:CheckBox ID="CheckBox3" runat="server" AutoPostBack="True"
            oncheckedchanged="CheckBox3_CheckedChanged" Text="İki Sütünlu Göster" />

    </div>
    <div align="left">
        <asp:BulletedList ID="BulletedList1" runat="server">
        </asp:BulletedList>
    </div>
    </form>
Uygulamamızda butona Kaydet butonuna basdığımızda seçtiğimiz konular bulletlist’e ekleniyor yalnız eklenirken CheckBoxList görünmünüde değiştirebiliyoruz bunun için altına eklediğimiz 3 CheckBox var görevleri yatay, dikey görünüm, tablo veya düz görünüm, tek sütunlu ve 2 sütunlu görünüm bunun için RepeatDirection,RepeatLayout ve RepeatColumns özelliklerini kullandık kodlarımız aşağıda

  protected void Button1_Click(object sender, EventArgs e)
        {
            for (int i = 0; i <= CheckBoxList1.Items.Count - 1; i++)
            {
                if (CheckBoxList1.Items[i].Selected)
                {
                    BulletedList1.Items.Add(CheckBoxList1.Items[i].Text);

                }
            }
        }

        protected void CheckBox1_CheckedChanged(object sender, EventArgs e)
        {
            if (CheckBox1.Checked == true)
            {
                CheckBoxList1.RepeatDirection = RepeatDirection.Horizontal;
            }
            else
            {
                CheckBoxList1.RepeatDirection = RepeatDirection.Vertical;
            }
        }

        protected void CheckBox2_CheckedChanged(object sender, EventArgs e)
        {
            if (CheckBox2.Checked == true)
            {
                CheckBoxList1.RepeatLayout = RepeatLayout.Table;
            }
            else
            {
                CheckBoxList1.RepeatLayout = RepeatLayout.Flow;
            }

        }

        protected void CheckBox3_CheckedChanged(object sender, EventArgs e)
        {
            if (CheckBox3.Checked == true)
            {
                CheckBoxList1.RepeatColumns = 2;
            }
            else
            {
                CheckBoxList1.RepeatColumns = 1;
            }
        }
hocam kaydet butonunun yanına bir buton daha koydum ve sıfırla yazdım basınca tabloda ne seçiliyse sıfırlamasını silmesini istiyorum ama hala bulamadım.. yardımcı olurmusunuz ( tşkler )